Okta's SCIM (System for Cross-domain Identity Management) integration with Haystack automates the lifecycle of user management, ensuring that your intranet directory remains accurate and up to date in real-time. By linking Okta and Haystack, you can:
- Automate User Provisioning: Automatically create Haystack accounts for new hires and deactivate accounts for departing employees directly from Okta.
- Synchronize Profile Data: Seamlessly push employee attributes—such as job titles, manager relationships, locations, and birthdays—from Okta to populate Haystack profiles.
- Maintain Data Integrity: Ensure that changes made in your primary identity provider (Okta) flow through to Haystack, maintaining a single source of truth for your organizational structure.
Prerequisites & Permissions
Before beginning, ensure you have:
- Haystack Admin: You must have access to the Haystack Admin Console to generate authentication tokens.
- Okta Admin: You need permissions to create and configure SCIM Applications within the Okta portal.
Critical Pre-Integration Step: Check Notifications
If your team is currently in implementation, it is extremely important to ensure that your workspace notification settings are turned OFF before you start provisioning users. Content notifications are sent to all users (even those who haven't signed in yet), and you don't want to launch prematurely!
- Visit the Security Settings page in your Admin Console.
- Toggle Email and Mobile Notifications OFF.
🆘 If you'd like help with this step, please reach out to your Haystack contact or support@haystackteam.com!
Step-by-Step Configuration Guide
NOTE: To enable SCIM, you must first set up an Okta Single Sign-On (SSO) app in Okta. If you haven’t yet done this, complete the steps here: Setting Up Okta Single Sign-On (SSO) . Then return here to add SCIM atop your SSO app.
Phase 1: Enable SCIM in the Okta
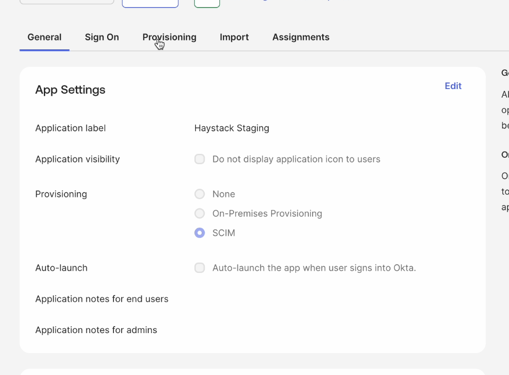
- In the Okta Admin Console, navigate to Applications and select your existing Haystack Single Sign-On (SSO) application.
- Go to the General tab and click Edit
- Under the Provisioning section, check the box for SCIM.
- Click Save. A new Provisioning tab will now appear in the application settings.
Phase 2: Find the SCIM Setup Details in Haystack
-
In a separate browser tab, open your Haystack workspace
-
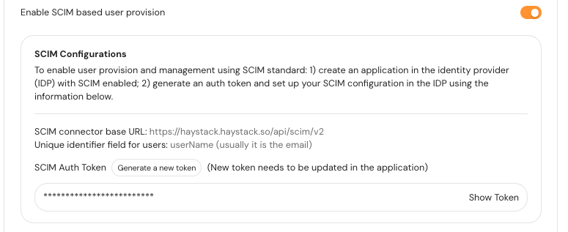
Navigate to the Admin Console and select User Provision & Login in from the lefthand menu.
-
Toggle ON Enable SCIM based user provision
-
Then click the Generate a new token button.
-
Click the Save User Provision Option at the bottom of the page.
-
Keep this browser tab open, we'll use it in the next steps!
Phase 3: Configure SCIM Connectivity
- Return to your Okta admin console and navigate to the newly visible Provisioning tab and select Integration from the left-hand menu.
- Click Edit and enter the following details:
- SCIM connector base URL: Paste the SCIM Base URL found on the SCIM setup section of your Haystack admin console.
- Unique identifier field for users: Enter userName
- Supported provisioning actions: Select Push New Users, Push Profile Updates, and Push Groups.
- Authentication Mode: Select HTTP Header.
- Authorization: Paste the token you created into the Haystack Admin Console
- Click Test Connector Configuration to ensure the supported provisioning action you’ve enabled are green. If all looks good click Close. If you see any errors, double check your URLs and token.
- Click Save.

Phase 4: Configure User Provisioning Settings
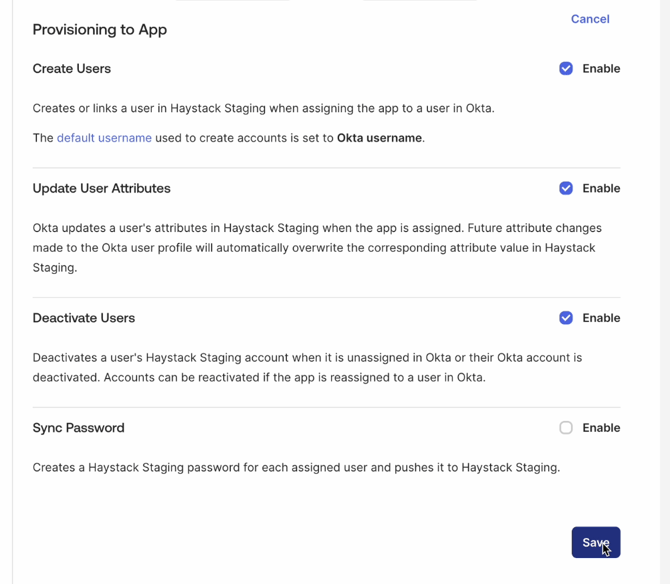
- In the Provisioning tab, select To App from the left-hand menu.
- Tick the check boxes to enable the following settings:
- Create Users
- Update User Attributes
- Deactivate Users
- Click Save.
Phase 5: Attribute Mapping and Profile Editor
📣 Please read this section very carefully! The mapping names are highly important. We suggest reading these full directions once before setting up your configuration.
To ensure Haystack receives the correct profile data, you must align the Okta profile attributes with Haystack’s requirements.
- On your app’s Provisioning tab, scroll down to the Attribute Mappings section of the page. Here you’ll see Okta’s table of default mapping.
- Click the Go to Profile Editor button just below the section header. Here, Once on the Profile Editor page, you’ll update the mapping specifications.
Clean Up Unused Mappings
First, let’s mark the mappings we will not use as Do Not Map. Okta recommends that you remove these and it helps prevent confusion in the future.
- On the Profile Editor, Click the Mappings button under the Attributes Header.
- Click the Okta User to Your App Name section of the header.

- Click the Green Arrows and select Do Not Map for the following attributes:
user.middleName, user.honorificPrefix, user.honorificSuffix, user.nickname, user.profileUrl, user.preferredLanguage, user.timezone, user.employeeNumber, user.costCenter, user.organization, user.division, user.managerDisplayName - Next, click into the Your App Name to Okta User section of the header.
- Click the Yellow Arrows and select Do Not Map for the same following attributes:
user.middleName, user.honorificPrefix, user.honorificSuffix, user.nickname, user.profileUrl, user.preferredLanguage, user.timezone, user.employeeNumber, user.costCenter, user.organization, user.division, user.ManagerName - Click Save at the bottom of the window.
Add Custom Attributes
Next, we’ll add custom attributes that Haystack supports but aren’t in the Okta default attribute list.
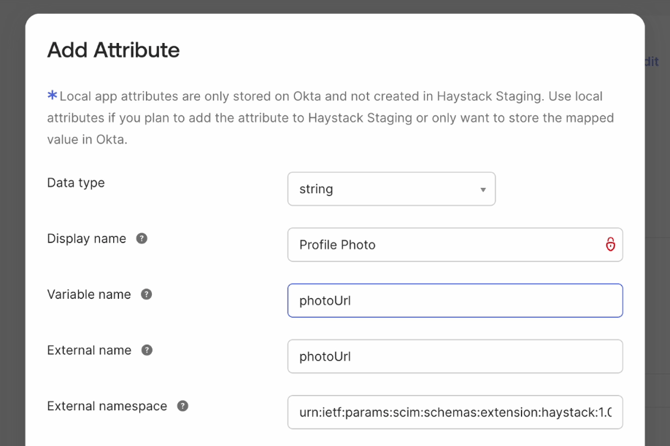
- Click Add Attribute at the top of the Attributes list.
- In the Display Name field, add Profile Photo
- In the Variable Name field, add photoURL
- In the External Namespace field, add urn:ietf:params:scim:schemas:extension:haystack:1.0:User
- Leave the rest of the fields as-is
- Click Save
Repeat these steps for all of the custom attributes listed below, replacing the fields with the information listed in the table’s columns. Play close attention to the capitalization—ensure you're adding the Variable Name and External name exactly as listed.
| Display Name | Variable Name | External Name |
External Namespace |
| Profile Photo | photoURL | photoURL | urn:ietf:params:scim:schemas:extension:haystack:1.0:User |
| Start Date | joinDate | joinDate | urn:ietf:params:scim:schemas:extension:haystack:1.0:User |
| Birth Date | birthDate | birthDate | urn:ietf:params:scim:schemas:extension:haystack:1.0:User |
| Pronoun | pronoun | pronoun | urn:ietf:params:scim:schemas:extension:haystack:1.0:User |
For Start Date, ensure the values in Okta follow the data format: DD-MM-YYYY.
For Birth Date, ensure the values in Okta follow the date format: MMDD or MM/DD or MM/DD/YYYY or Month D, YYYY, or YYYY-MM-DDTHH:MMss, or YYY-MMYHH:MM:ssZzz:00.
For photoURL, ensure the value in Okta is publicly available photo URL.
Manager Mapping

managerValue -> user.managerId which is the manager’s email address that should match the email address in Haystack.
All supported mappings below:
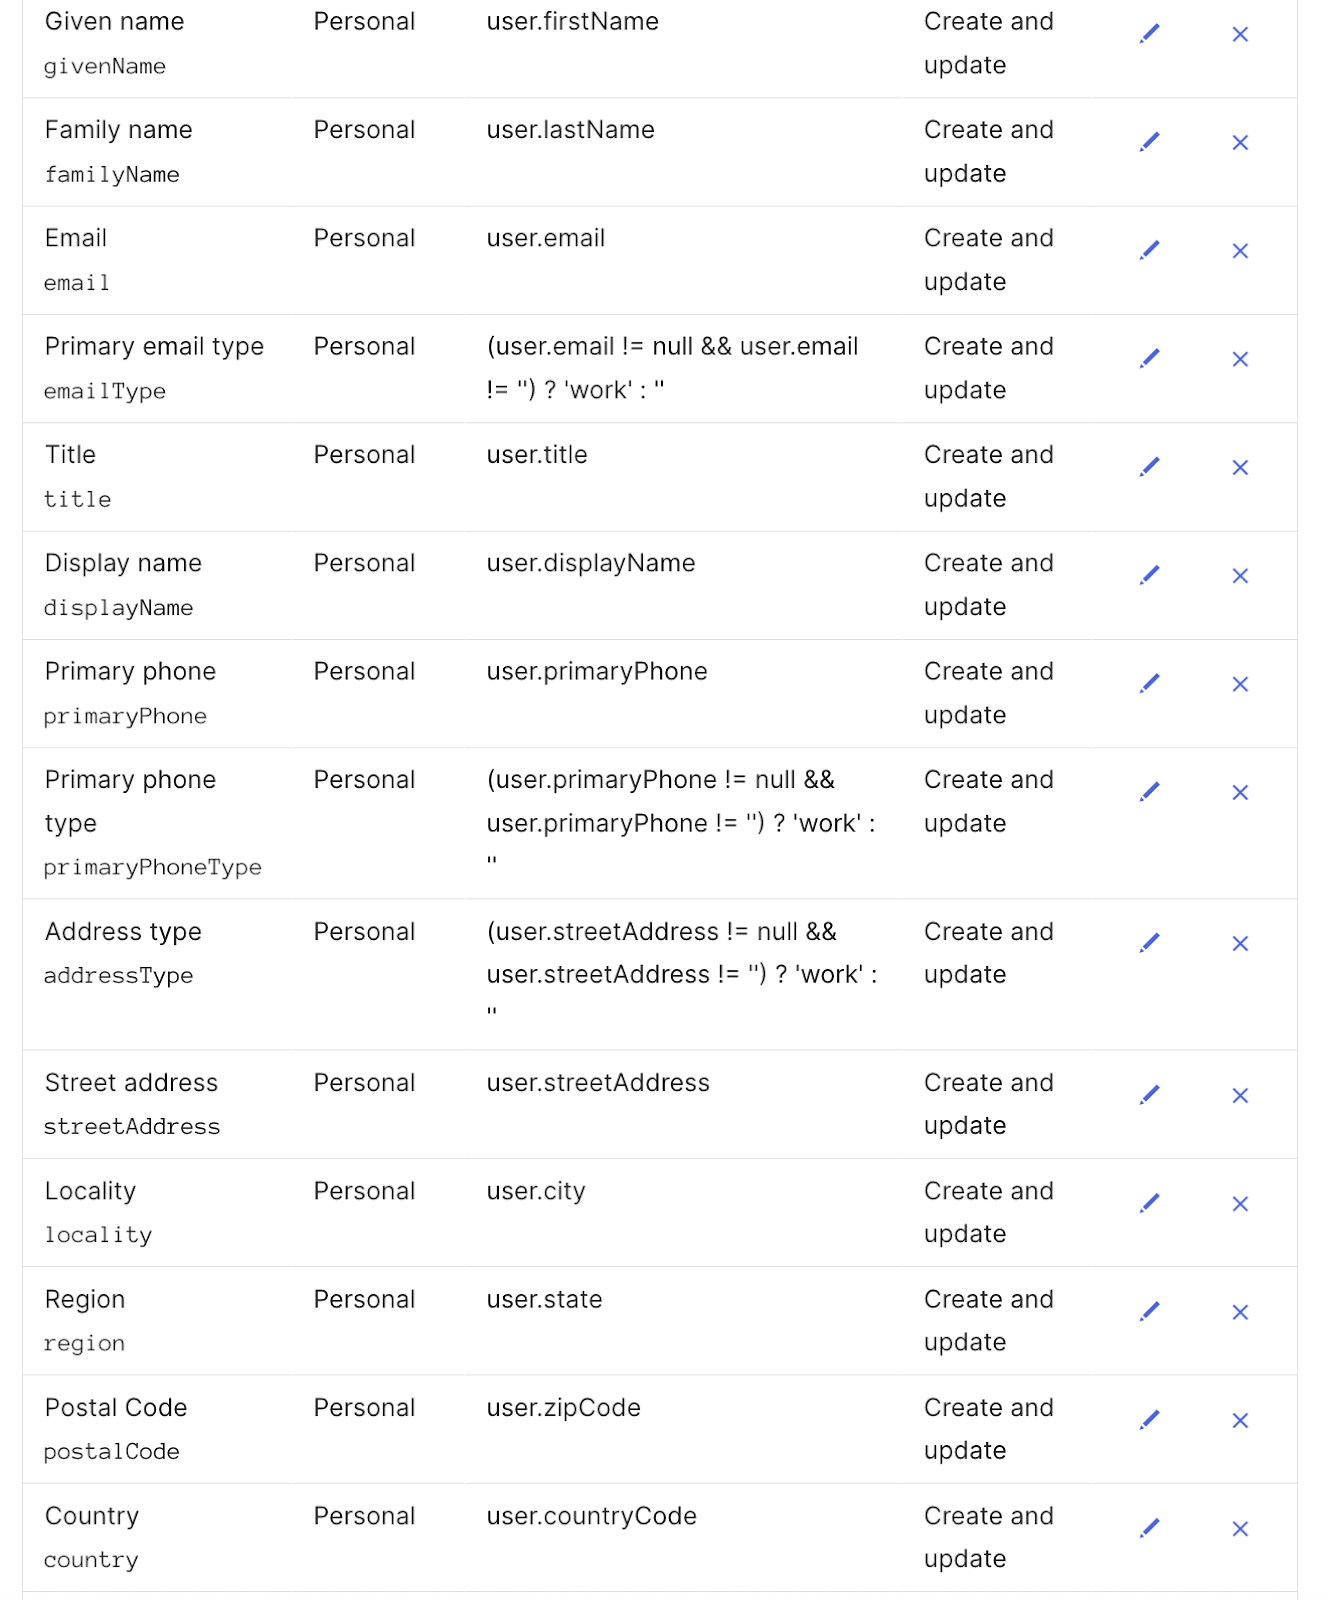

Map Custom Attributes to Okta Profile Attributes
- Return to the Profile Editor and click the Mappings button under the Attributes header.
- Click on the Okta User to Your App Name section in the header.
- Scroll to the bottom of the attributes list to find your newly added custom attributes. They’ll be marked with a grey broken arrow, indicating they are unmapped.
- For each attribute, click the blank field box on the left side of the mapping and select the Okta profile field that houses the employee data that correlates to the custom attribute.
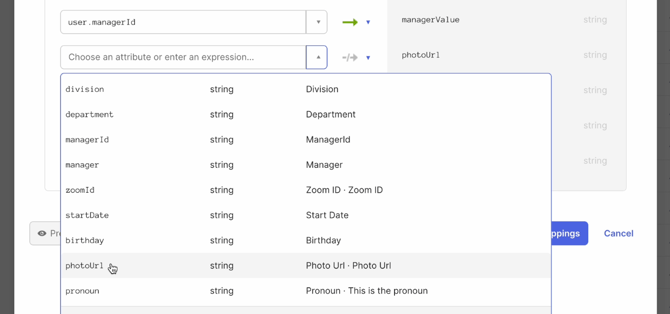
- Use the Preview tool if you’d like to confirm your mappings are populating the correct profile data for your users.
- When all of your new custom attributes are mapped, click Save Mappings. Then click Apply Updates.
Phase 6: Assign Users to the App
Let’s assign your users to the app!
- Find your newly created app in the Applications menu
- Click Assignments in the header, then click the Assign button.

- From the dropdown, select to assign Users (for one by one testing) or Groups if you’re ready to provision everyone.
- Select the Users or Groups to assign as needed.
- Once assigned, Okta will begin provisioning these users to Haystack automatically.
Best Practices
- Start with a Test User: Before assigning large groups, assign a single test user to the app and verify their profile updates correctly in Haystack.
- Namespace Accuracy: Ensure the custom attribute namespace (urn:ietf:params:scim:schemas:extension:haystack:1.0:User) is copied exactly, as it is case-sensitive.
- Public Photo URLs: For profile photos to sync correctly, they must be hosted at a publicly accessible URL.
- Date Formats: Ensure your Okta date attributes follow a supported format listed at the bottom of the custom attributes table above for Start Dates and Birthdays.
Need More Help?
If you run into any issues with your SCIM token or attribute mapping, our team is here to help!
- Chat with us: Use the support chat icon in the bottom right of this page.
- Email us: Reach out to support@haystackteam.com.
Keywords: Okta, SCIM, Provisioning, User Sync, Integration, Admin, Attributes, Automation, SAML, Profile Mapping