📌 Before you begin: Please make sure you've configured your workspace notification preferences. Once you've set up provisioning, new users will receive notifications even if they haven't signed into their account yet. You can adjust these settings on your Admin Console's Security Settings Page.
Create a OneLogin application (SCIM v2 Enterprise, full SAML)
Skip this step if you already have a SAML application for Haystack in OneLogin. Please see the instructions in this document for creating a SAML application for Haystack in OneLogin.
Step 1: Enable SCIM in Haystack and Generate a Token
First, you'll need to enable SCIM and grab a special code to connect the two apps.
-
In your Haystack Admin Console, go to User Provision & Login.
-
Enable SCIM-based user provisioning.
-
Generate an auth token and copy it. You'll need this in the next step!
Step 2: Configure SCIM Provisioning in OneLogin
Now, let's head over to OneLogin. If you haven't already, you'll need to create a OneLogin application (SCIM v2 Enterprise, full SAML). Once that's done, you'll configure the SCIM provisioning.
-
Enable the API connection.
-
Fill in the fields with the following information:
-
SCIM Base URL: Replace "dev" with your Haystack domain. The URL should look like
https://yourdomain.haystack.so/api/scim/v2 -
SCIM JSON Templates: Use the template in Step 4 below.
-
SCIM Bearer Token: Paste the auth token you copied from Haystack.
-
Custom Headers: Leave this empty.
-
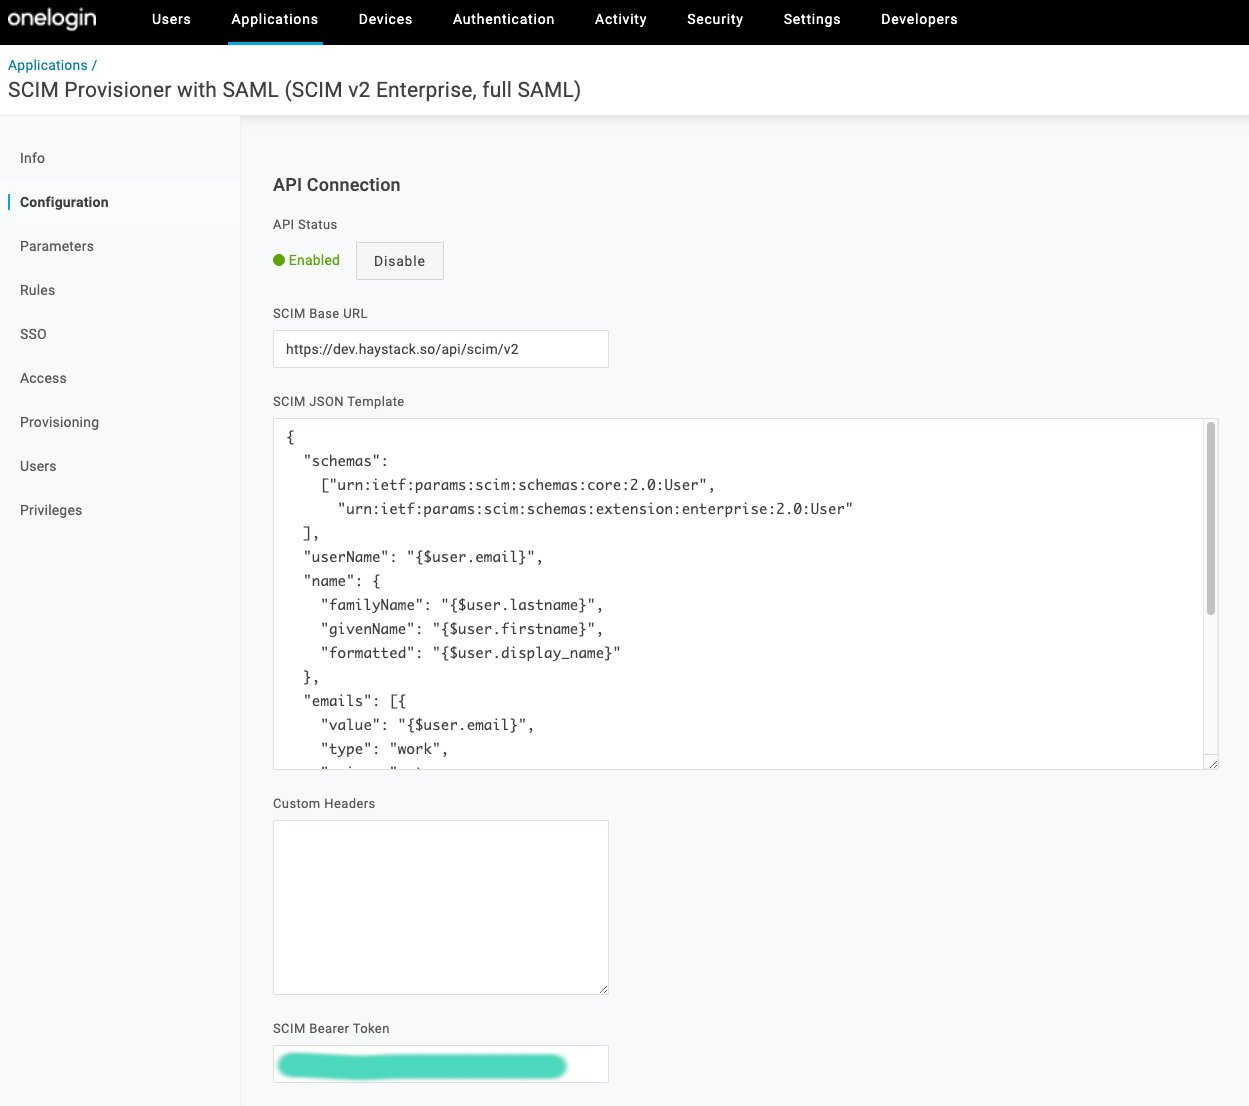
3. Click Test Connector Configuration to make sure everything is working properly.
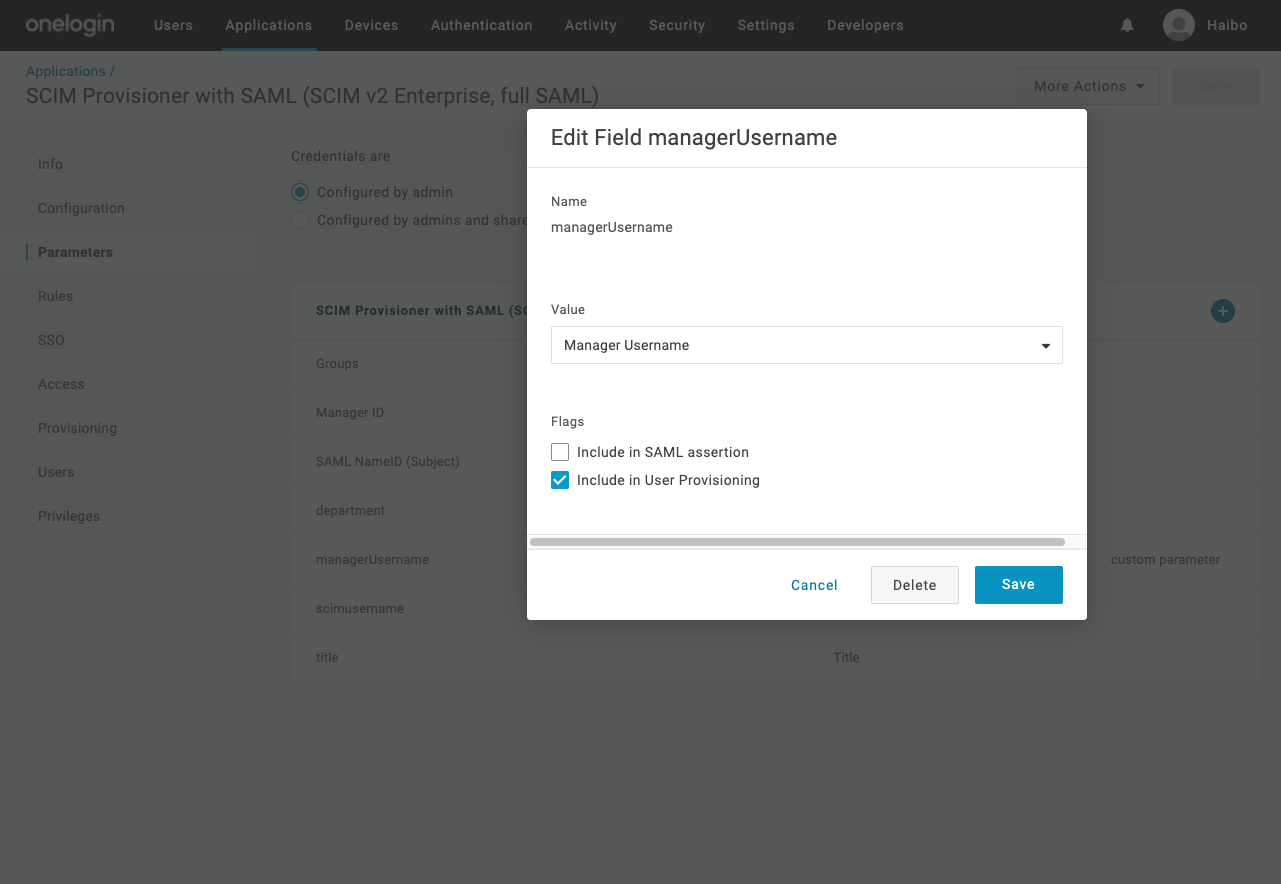
Step 3: Add the managerUsername Parameter
This step is key to making sure your org chart and reporting relationships are accurate in Haystack.
-
Navigate to the Parameters tab in your OneLogin application.
-
Click the + icon in the upper right.
-
Enter the name
managerUsername, and check the box for "include User Provisioning." -
Click Save.
-
In the "Value" dropdown, select
Manager Username.
Step 4: Configure the SCIM JSON Template
This code tells OneLogin how to map user data to Haystack. You'll need to copy and paste this into the SCIM JSON Templates field from Step 2.
|
{ "schemas": [ "urn:ietf:params:scim:schemas:core:2.0:User", "urn:ietf:params:scim:schemas:extension:enterprise:2.0:User", "urn:ietf:params:scim:schemas:extension:haystack:1.0:User" ], "userName": "{$user.email}", "name": { "familyName": "{$user.lastname}", "givenName": "{$user.firstname}", "formatted": "{$user.display_name}" }, "emails": [ { "value": "{$user.email}", "type": "work", "primary": true } ], "phoneNumbers": [ { "value": "{$parameters.phoneNumber}", "type": "work" } ], "title": "{$parameters.title}", "urn:ietf:params:scim:schemas:extension:enterprise:2.0:User": { "department": "{$parameters.department}", "manager": { "value": "{$parameters.managerUsername}" } } } |
Add the following custom fields and mappings if your OneLogin has them in user profiles.
"urn:ietf:params:scim:schemas:extension:haystack:1.0:User": {
"photoUrl": "{$parameters.photoUrl}",
"joinDate": "{$parameters.joinDate}",
"locality": "{$parameters.locality}",
"region": "{$parameters.region}",
"countryCode": "{$parameters.countryCode}",
}
If your OneLogin user profiles have custom fields for things like photoUrl, joinDate, etc., you can add those to the mappings in the same way you added managerUsername. Just follow the structure above!
You're all set! Enjoy that seamless user management. 🙌
Keywords: OneLogin, SCIM, user provisioning, user profiles, data mapping, synchronization, admin, IT, guide, instructions