![Logo (Black Text)-1.svg]](https://support.haystackteam.com/hubfs/Logo%20(Black%20Text)-1.svg)
Groups are the heart of collaboration in Haystack. Whether it’s a departmental hub, a social club, or a project team, the Group Settings menu provides the tools you need to curate content, manage privacy, and ensure your group reflects your team’s culture.
Prerequisites & Permissions
To access and edit Group Settings, you must hold one of the following roles:
-
Workspace Admin
-
Group Admin
-
Group Owner
Navigating to Group Settings
-
Visit the Group Main Page you wish to edit.
-
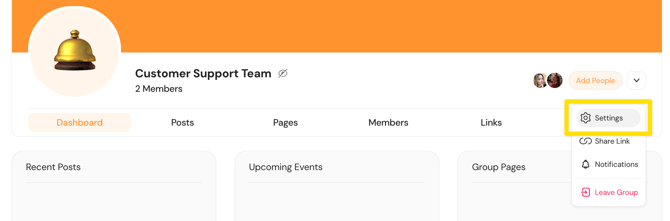
Click the Caret Drop-down Button (⌄) located on the right side of the header.
-
Select Settings from the menu to open the customization modal.
Step-by-Step Guide to Group Customization
Let's walk through your Group Settings tabs from top to bottom. 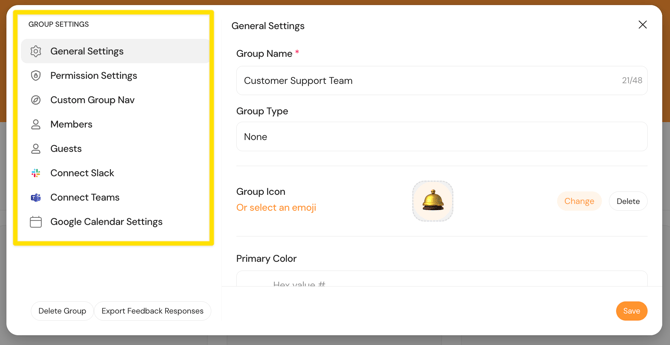
1. General Settings: Branding & Identity
This is where you define the "look and feel" of your group.
- Group Name: Update the name that appears to all members.
- Group Type: Categorize your group (e.g., "Department" or "Social").
- Group Icon: Select an emoji or upload a custom image.
- Group Branding Colors: Enter Hex Values for Primary and Secondary colors. This is perfect for sub-brands or ERGs with their own color palette.
2. Permission Settings: Privacy & Approvals
Control the visibility, access levels, and publishing workflows of your group:
- Visibility: Choose between Open (anyone can join/view), Closed (visible in directory, but requires an invite), or Secret (hidden from everyone except members/admins).
- Contribution Rights: Set who can create posts, events, and pages. You can keep it open to "All Members" or restrict it to "Admins/Owners".
- Post Approvals: If you require posts to be reviewed before going live, turn on the approval toggle here. You can configure it so that only Workspace Admins can approve, or allow both Workspace Admins and Group Owners to approve content.
- Manage Editors: Scroll to the bottom of the permissions page to view and assign Single-Page Editors. This is where you can assign granular editing access for specific pages without giving away full Group Owner rights.
3. Custom Group Nav: Custom Navigation Settings
You can reorder or hide the tabs that appear on your group dashboard (e.g., Dashboard, Posts, Pages, Members). The first tab in your list will act as the default landing page for the group.
Learn more about customizing group navigation here: Customizing Group Dashboards, Navigation, and Assets.
4. Members: Member Management
The Members tab is your command center for your roster:
-
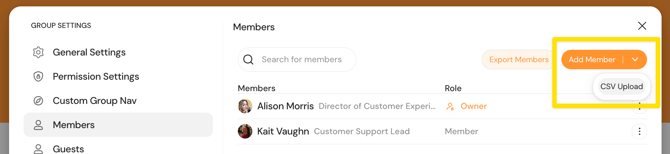
Add Members: Add individuals one-by-one by name or use the CSV Upload tool to bulk-add a large list via email address.
-
Remove Members: Use the three dots (⋮) to remove a user. Haystack does not send a notification for removals, making it a discreet process for admins.
-
Grant Ownership: Click the three dots (⋮) next to a member's name to Make Owner (Note: It can take up to 5 minutes for a new owner's permissions to cache and activate).
5. External Integrations
Connect your group to the tools your team uses daily:
- Slack and Teams: Automatically push new Haystack posts into specific chat channels.
- Google Calendar: Sync group events directly to a shared calendar
6. Advanced Tools
In the bottom lefthand corner of your settings window, you'll also spot too advanced feature buttons.
-
Export Feedback: Download a report of "Thumbs Up/Down" responses from your group's pages to see what content is resonating. Learn more about this tooling here: Content Feedback Overview.
-
Delete Group: Permanently remove the group and all of its content, settings, and members.
Warning: Please use the Delete Group tool with caution. There is no Group Restore tool available to you in the product. If you delete a group by accident and need it restored, please reach out to our support team for their assistance.
Best Practices
-
Consistent Icons: Use clear, high-quality images for icons to make the Group Directory easy to navigate at a glance.
-
Audit Permissions Regularly: As teams change, ensure you have at least two Group Owners so management isn't dependent on a single person.
-
Use Branding for ERGs: If you have Employee Resource Groups, give them their own branding colors to make their pages feel like a dedicated community space.
Need More Help?
We’re here for you! If you have questions or accidentally deleted a group and need a restoration, please reach out:
-
Chat: Click the chat icon in the bottom right of the Help Desk.
-
Email: support@haystackteam.com
Keywords: Groups, Settings, Permissions, Branding, Members, Customization, Slack Integration, Teams Integration, CSV Upload, Group Privacy